WASMA
Windows Assignment System Monitoring Architecture
Overview
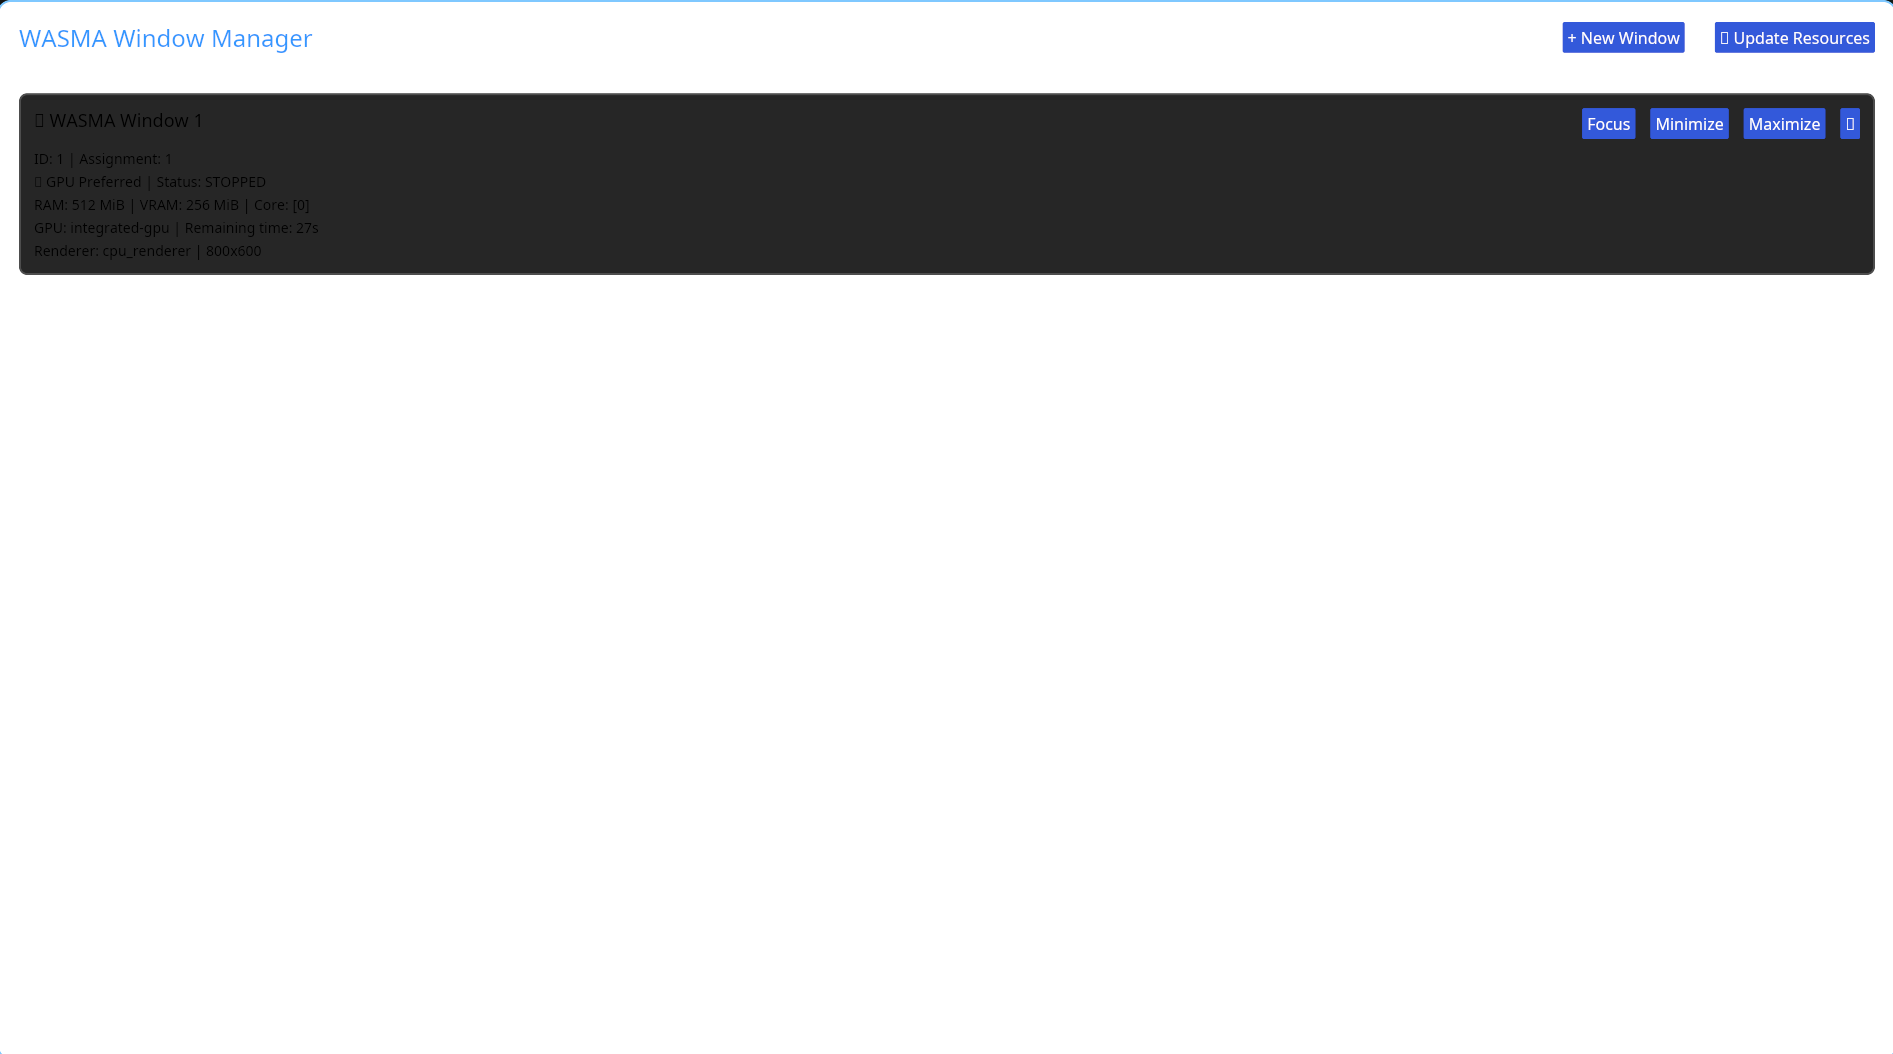
The main goal of WASMA is to provide a controllable environment from scratch, including Windows Compositors, and by removing them from the fancy, hype-filled logic, it offers advantages in terms of portability and usability thanks to its stable and guaranteed logic. In the environment where we offer complete system-level control, you will now be able to use all resource usage from scratch in Windows, you will be able to determine how much GPU, CPU, and RAM resources will be used, and even determine it according to specific profile criteria!!
Getting Started
If you want to know the necessary usage instructions for the cmdline tool, just type wasma --help.
Platform Support
Cross-platform; The only dependency is Rust. Other libraries are optional in terms of optimization and customization.
Supported platforms: Linux, Windows, macOS, BSD
Optional legacy version: can be used on SystemV, Unix, Plan 9, Bell, or any Rust-supported operating system.
Architecture
Layer-Based Design
Modular architecture with clear separation between compositor, window manager, and UI layers.
Event-Driven
Asynchronous event processing for responsive window management and rendering.
Resource Management
Intelligent memory and GPU resource allocation for optimal performance.
Installer
1. Clone the Repositorygit clone https://github.com/Azencorporation/Wasmacd Wasmacargo build --releaseTesting
1. Switch to the Directorycd Wasma/src/clientcargo benchWM Compositor
The WASMA compositor provides hardware-accelerated window composition with support for advanced effects, transparency, and multi-monitor configurations. Each window source can be individually controlled and monitored.
Key capabilities include real-time window capture, composition pipeline customization, and fine-grained control over rendering behavior.
UI Frontend
The UI frontend layer provides a flexible interface for interacting with the WASMA system. Applications can specify their own window sources, define custom rendering pipelines, and integrate seamlessly with the compositor.
Window Control
Additionally, web-based window management and embedded remote viewer support are available. Management of a single network (singularity) or multiple network (multi) instances is possible.
Example Window Configuration
// WASMA IN operational configuration
uri_handling_op {
    multi_instances = true;
    singularity_instances = false;
    protocol_def : tor://127.0.0.1:80 // This is an example; the user can specify the desired IP block and port.
    domain_def : azccriminal.onion // This is also an example; if live streaming over the domain is required.
    uri_handling_window_appspef : file://server_request/request.manifest // Window permissions and distribution permissions can all be determined here. Limits per request and access to which window is allowed are determined here.
    uri_compilation_define : uri://compilation_server:90 // This specifies whether the window is runtime compilation or real-time compilation.
    #_END_BLOCK_DEFINE // Closing at the beginning of the block, separate things will be specified below

    uO:?? user_withed(*sysuser) // Those who want to drop root: sysroot
    rg0:?? groups_ewithed(*groups_insys) // Groups withed extension can be managed and specified via user
    r0:?? in_limited_scope:ip_base10 in_scoped_bylevel:50 in_request_withed:glx_renderer // Setting limits per render request, pixel loading or content limit via bylevel, another renderer can be specified instead of glx_renderer.
}

nonprof = false
cpu_withed { core_affinity_stat("cores:5") }; // Optional nonprof if true, it dynamically allocates cores to itself
gpu_withed { gpu_affinity_withed("vram_public_gen:2048MB") }; // Optional nonprof if true, it dynamically allocates cores to itself
#U_WITH_CTL // Necessary closing for screen output.

offline_handling_section {
    offline:1 // If 1, offline windows are allowed; if 0, offline windows are closed.
    uri_schema: uri://wasma.bin//protocol_offline; // Offline window activation
    uri_section_start : OFFLINE_LOCALHOST_STAT // Offline local network memory allocation
}
Source Assignment
Applications can programmatically assign and control window sources with full transparency.
Composition Rules
Define custom composition rules for window stacking, blending, and effects.
Event Monitoring
Real-time monitoring of window events, state changes, and user interactions.
Core Features
Manifest System
Furthermore, with the .manifest, you will no longer have just the simple launcher logic of .desktop; you will be able to manage all resource usage, app URI, photos, and the basic window usage logic of the application.
Sample Manifest Format
The permission system can be defined within the manifest, or you can define application window permissions outside the manifest using source*. You can also use the default permission systems.
// When used in the manifest, files starting with [source] must be present; when used outside of [source], files starting with source* must be present. This can change depending on custom permission variables.
name = app.name
uri_appimg = file://usr/share/pixelevel/map/12x12.png *// image path
uri_shortcut = file://Desktop *// shortcut path
app_uri = file:///usr/bin/example-app *// example application path
cpu_perception = 1 *// can be defined via GUI, so this number can be changed
cpu_affinity = perception { 100 resource_max : 10 } bitmax *"20" *// defined bitmax limit per core
cpu_core_serve = "1" affinity_default *// memory allocated for the server can be set dynamically if desired. "dynamic" usage is set according to affinity as default, but you can define it separately if you wish.
gpu_perp = "VRAM:allocation:size_bydefault = 1024" *// maximum GPU memory allocated for the application can be located instead of allocation "location" The value should be used, but you can directly allocate the memory based on an area to be allocated, but this is problematic, so allocation is recommended. The sizebydefault field determines the maximum usage, not by default, but by custom, sizebyinsection, sizebyprop, etc., directly from the table according to custom or prop.
gpu_using = "1024" { 100 resource_max : 15 } bitwidthed *"25" *// max usage and bitwidth
ram_using = "DDR5" "1024MB" "*cache_resolved:swaponline" *// RAM usage area is determined by default, but you can set the swap usage allocated for cache to online or offline if you don't want it.
ram_used_bitwidth = "1024MB" "bit_width : 15" *cache_resourceing : "20%" *// bit To determine RAM usage and cache resource usage per width, use the following commands:
uri_app_source = file://usr/bin/app *permission_check *POLICY_ENV *// policy set env app resource execution
uri_app_resource = file://local/bin/app,file//bin/app *// optional depending on different variations
permission_check = URI:PERMISSION_DEVEL://string : permission_devel *USER *// open to user-level permission development, i.e., directory path $HOME/$USE_CONFIG/permission_app/source is retrieved from env environments. If it is a variation such as permission_sys or permission_preset, permission_pinning, permission_purning, the directory paths are different.
WASMA-UBIN
With wasma-ubin, you will be able to add missing GTK/QT/ICED features by analyzing them through the binary file. Each platform will support certain features according to its own design limitations. Now you will be able to experience a full application theme widget experience with those features!
XDG-WSDG Conversion Support
xdg-wsdg conversion support: Now you can use a modern, advanced, fully customizable DG environment with wsdg. "You can also convert the xdg environment to wsdg without any problems in any application."
 Example environment path file env.path:
use_shell_std: bash/zsh  *// Shell syntax standard
clamp_use_to : 2 *// Clamp width difference of the array type at the beginning

env_to_$SHELL {
# BASIC standard environment variables.
use_std export:$HOME = /home/array *// Example of home directory location
use_std export:$CONFIG = /home/.configurationer *// Example of config directory -> over_clay_dg *XDG = XDG_CONFIG_HOME *// By overriding dg paths, the specified dg path will be directed according to the variable specified. However, if you are doing rewriting by defining XDG variables, it is not recommended to use the overriding method.

use_std export:$LOCAl = /home/local/variables *// Example of local directory
use_std export:$SHARE = /home/.local/share *// Example of shared directory location; valid within shared areas that come with local
use_std export:
# If you plan to specify paths for redirection directly through XDG without overriding
# XDG variables rewriting and configurable path set and translation layer (supported)
XDG_DATA_HOME=/home/.localizition
XDG_CONFIG_HOME="home/.config" *// Example of XDG configuration path
XDG_CACHE_HOME= "/home/.cacheing" *// Example of XDG cache path
XDG_RUNTIME_DIR= "/run/$USE_STD/.conv/$UID" *// If you do not want to specify the directory according to the shell standard, use $USER. It is recommended not to frequently change to maintain the XDG directory logic.
XDG_STATE_HOME= "/home/state/" *// Example of XDG state home path

*// IMPORTANT NOTE: After export, if you don't want application files to exist in both paths, you can specify only one directory path.

use_std export:$XDG_DATA_HOME
use_std export:$SSH_ENV = /home/.ssh *// Example of ssh directory, this is optional and can be left out
*// Desktop group configuration
use_std export:$ENV setenv $SHELL_VARIABLES _open_mime_dg *// Shell-based mime desktop group variables, meaning these settings can be used in any shell environment and within other dg environments.
Additionally, the WSDG-XDG environment offers advanced solutions for application startup logic, whether directly booted or after the application is launched. You can manage application startup logic with a configuration file, but the file must be in the following format: "appstarter.config", "applicationnamestarter.config", or "examplestarter.config". This format is the only acceptable format.
Configuration used to manage the example application startup structure appstarter.config:
#_L_BIND_STREAM *// Integrates with WASMA stream calls.
io_section _run_user_appconfig ip_secondlevel = no trueconfig = yes promise_endlevel /usr/bin/appconfig *// For previously configured calls, the promise_level defines how many requests can be made per access, and ip_secondlevel defines the rate per IP per request.
$BIND_STREAM io_by_ctl = config.promise.maxlevel = 10 *// Limits the number of calls per request, defined beforehand. However, ip_secondlevel does not conflict because it represents a reload per application and request level.
$BIND_STREAM io_by_ctl = config.ip.secondlightinglevel = 20 *rate_fn {
enequal_ip ("127.0.0.1") *// IPs outside this will not have any rate function applied, meaning no limit.
ensetdb_reg ("99.25.43.11") *// Rate limit applied per IP for database field.
ip_prof = highlevel lighthing _array *U bind consexcept *ptr /usr/bin/profctl --highlevel _IP_; reg_limit U_limit _Ptr_limit constptr_LIMIT *// In this example, there is a limit for each IP request, but it can be set to unlimited by using "unlimit" instead of a defined limit. You can specify a limit for the second level if needed. If you set "no level" instead of "highlevel," you can create a custom line and adjust the custom IP profile. Alternatively, you can set "prof" or "lowlevel_limit" and configure ptr usage along with other settings.
System Capabilities
- Full control over window rendering pipeline
- Hardware-accelerated composition
- Multi-monitor aware architecture
- Custom shader support for window effects
- Real-time performance metrics
- Plugin system for extensibility
- Cross-platform compatibility layer
API Reference
The WASMA API provides comprehensive access to all system features. Documentation includes detailed examples, best practices, and performance considerations for each API endpoint.
Permission System
The permission system can be defined within the manifest, or you can define application window permissions outside the manifest using source*. You can also use the default permission systems.
Example Permission Configuration
// When used in the manifest, files starting with [source] must be present; when used outside of [source], files starting with source* must be present. This can change depending on custom permission variables.
// Example directory paths
// permission_sys = $ROOT/lib/share/permission/source
// permission_pinning = $ROOT/lib/share/permissioner/source_pinning // Permissions are chattr; modification rights are possible if the user wishes.
// permission_purning = $ROOT/lib/share/permissionpurnering/source_purnering // Permissions are dynamic; each application is distributed with a small number of permissions. You may need to grant permissions later.
// Permission format depends on the applist, but
// USE_ETHERNET_CONNECTION = 1 // Ethernet connection usage application
// USE_WIFI_CONNECTION = 1 // Wi-Fi connection Usage of application
// USE_CHATTR_DISABLER = 0 // Should pinning be disabled if the application wants it or if you want it?
// USE_FILE_EXCEPTION = *file://Documents // Allow access only to a specific file area *&ALL // Access to all file areas is queried *file://* // Unqueried access
// USE_FILE_WITDH = 20 GB // Determine application width. By default, this is false because it can cause application problems and is often unnecessary.
// USE_WEB_RESOLVEING = http://brave.com // Specific web resolution resource, but with this feature, you only specify that the application can interact with a specific domain. The application interaction structure may be broken, so you can leave it as ALL_DEFAULT if you want.
// USE_USB_CONNECTIONAL = driver_disk_iot // Allows access to all USB drivers. *ALL_DRIVER: Allows access to specific drivers. driver_disk_iot: Allows access to disk-based USB drivers. driver_ethernet_usb_port: Allows access to Ethernet-based USB adapters. driver_usb_media: Allows access to media-based devices only. driver_usb_plug_and_play: Allows plug-and-play permissions.
// USE_USB_NET = 1 // Allows network access over USB. 0 access disabled, 1 access enabled.
// USE_USB_PLUG_AND_PLAY = ALL // Allows access to specific plug-and-play devices. For example, "microphone" allows access to microphone-based devices, "camera" allows access to USB camera modules, "mouse" allows access to mouse modules only, "midi" allows access to MIDI-based devices, "ALL" allows access to all devices. Access
// USE_WEBCAM_OPENED = &step_by_device = :use_webcam // To set webcam access when needed, use "use_webcam"; to set access in all cases, use "ALL" without step_by_device
// USE_MICROPHONE = ALL // Microphone access: One-time access "JUSTING"; access disabled "NO"; access always "ALL"
// USE_AUDIO = ALL // Audio access: One-time access "JUSTING"; access disabled "NO"; access when needed "OPENED_ALL"; access always "ALL"
For complete API documentation, refer to the developer guide and code examples in the WASMA repository.